
Solution is to delete the folder in adsiedit
You might be very excited to run Kali on your Raspberry pi 4, here’s how you do it.
1: Make sure bluetooth is enabled(at boot) and started.
systemctl enable bluetooth
systemctl start bluetooth
2: Install blueman
apt install blueman
3: Check the settings and task bar. You should see the bluetooth icon now.

Bluetooth Manager
4: Launch the manager and search for devices.

That’s all folks, thanks for reading.
Imagine this: You were at airport or hotel, you logged in to a web page using a public computer, you logged out and went away , someone came over and copied your cookie, he can restore the session on another PC/laptop. Here’s how you do it :
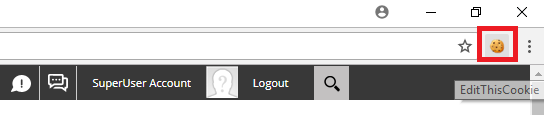
1: Download “edit this cookie plugin” and install. Login to a webpage to test, in this tutorial I will demonstrate on Dot Net Nuke :
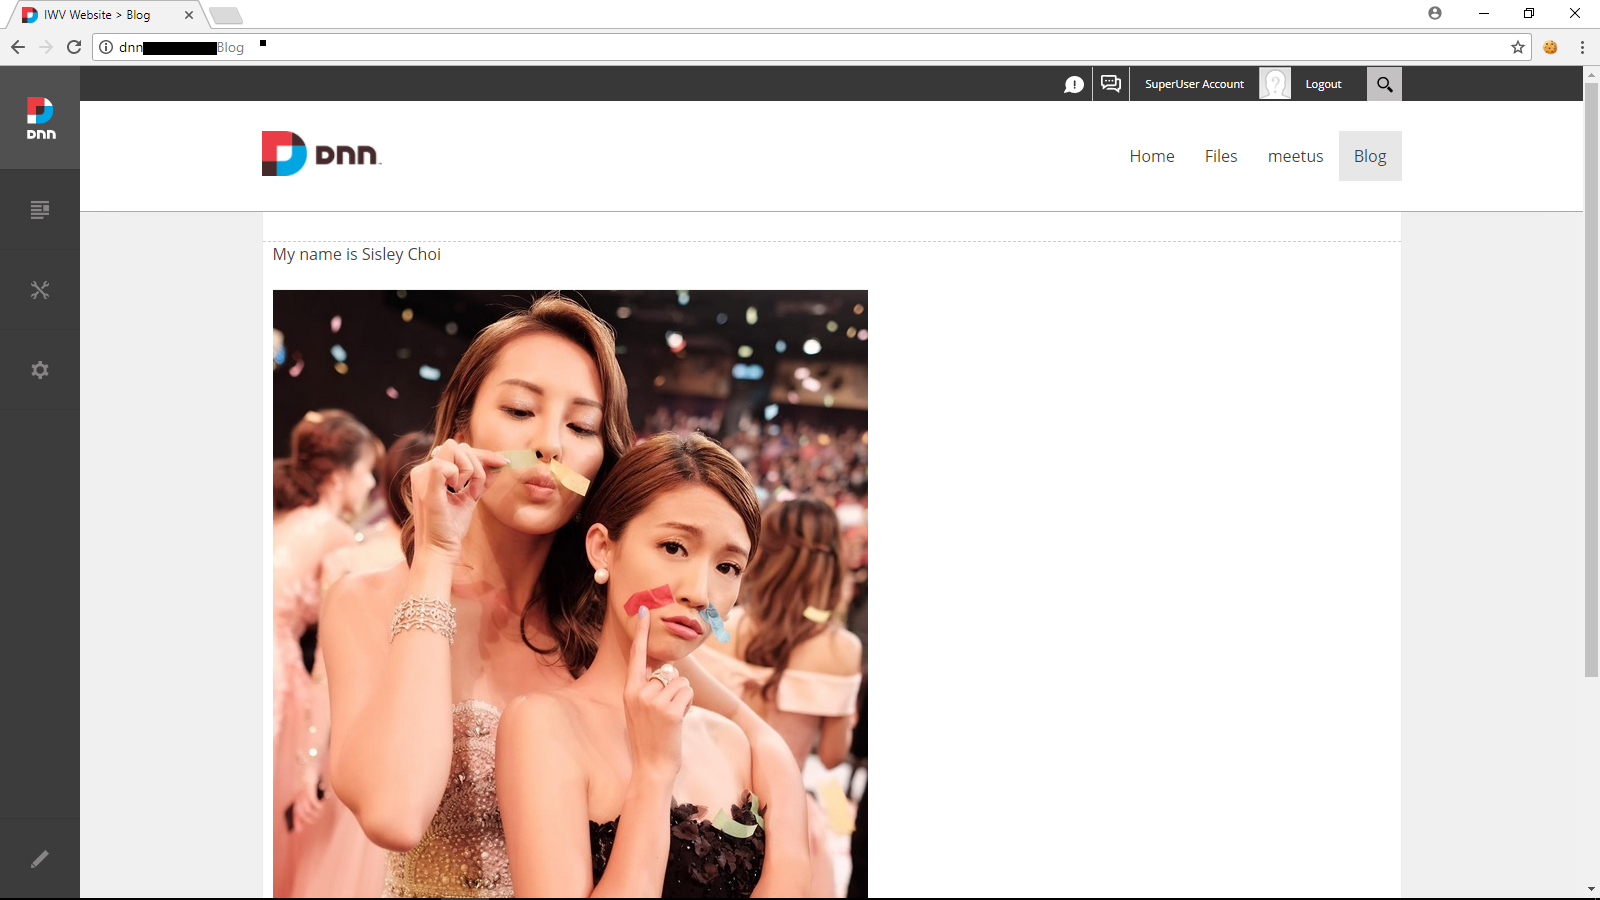
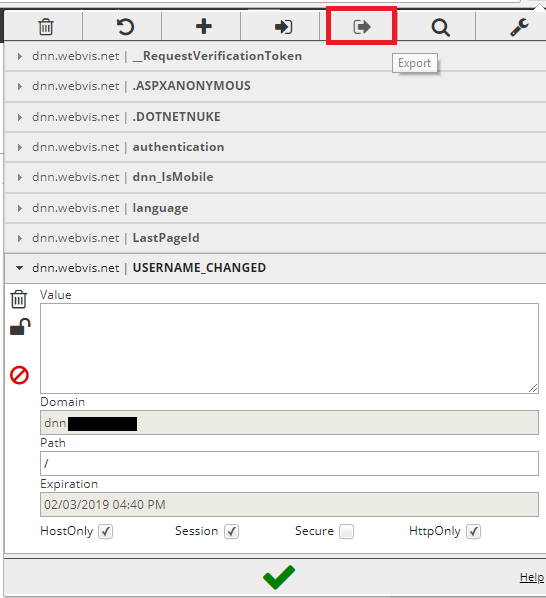
2: Click on the Edit This cookie.
3: Click on export
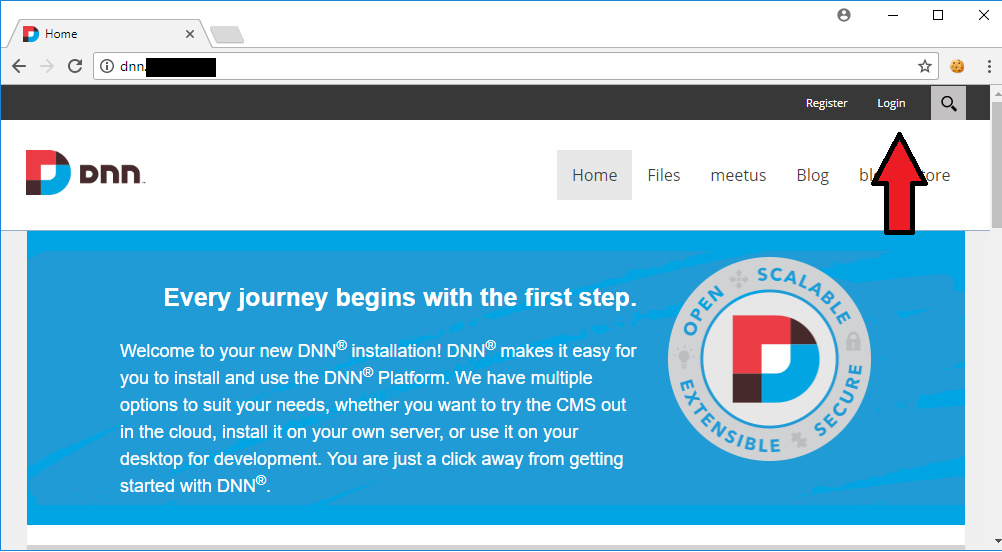
4: Now, I am going to open another browser from another PC, notice I am not currently logged in:
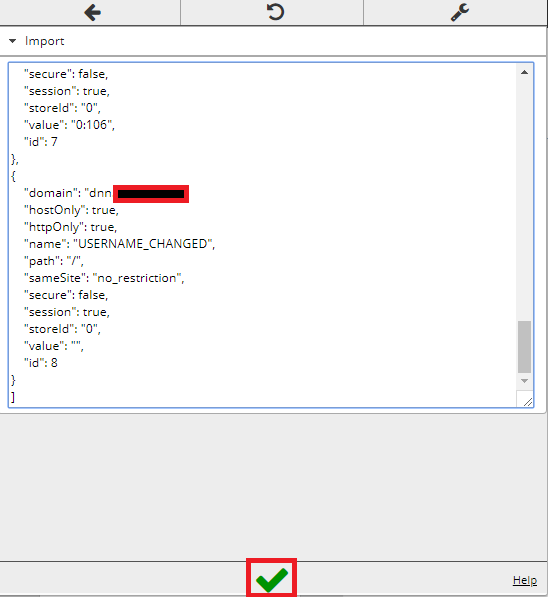
5: Click on the Edit This Cookie, then select import:
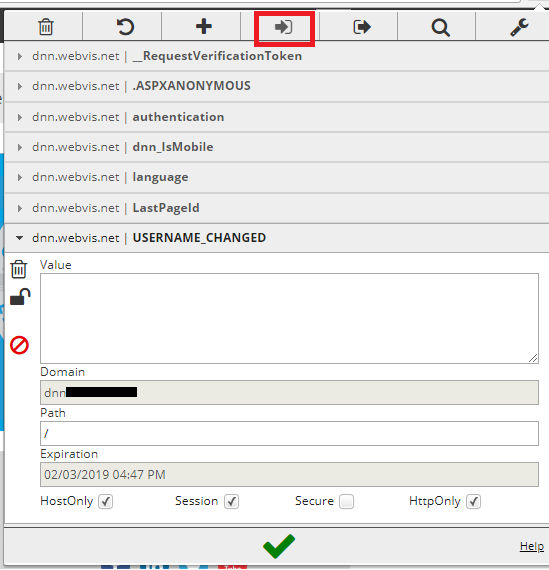
6: Ctrl-V to paste, then click on the tick:
7: Finally refresh the page. In this screenshot, you can see I can login as a superuser without providing the credential !

The purpose of this write-up is to remind you to be extremely careful when using public PC or even office PC.
Thanks for reading !

This is a fast guide to get your php running. I won’t be explaining why you need to do this and why you need to do that. You can google it to learn more.
1: On Server Manager, start power shell and run this command:
- import-module servermanager
- add-windowsfeature web-cgi
Check for any error message, if you are running on Shared Configuration, you might need to disable it first.
2: Download php here :
http://windows.php.net/download/
You need to download vc14 x64 non-thread safe version.
3: Extract the php zip file to c:\php .
4: The VC14 builds require to have the Visual C++ Redistributable for Visual Studio 2015 x86 or x64 installed. Go ahead and install , it is mandatory.
5: Launch IIS manager.
6: Select the web server you want to edit, on the features view double click on Handler Mappings.

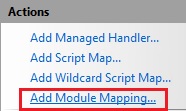
7: Click on Add Module Mapping.
8: Enter as follow. Make sure the file extension is exe and not dll.
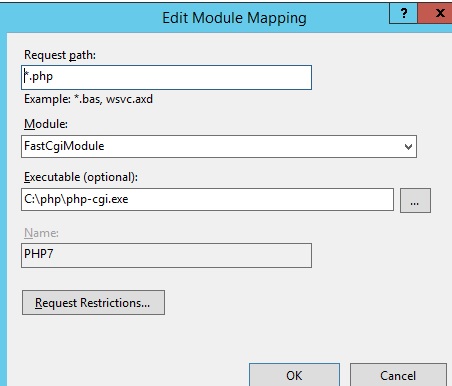
9: Click on Request Restrictions and select mapping>Invoke>File.
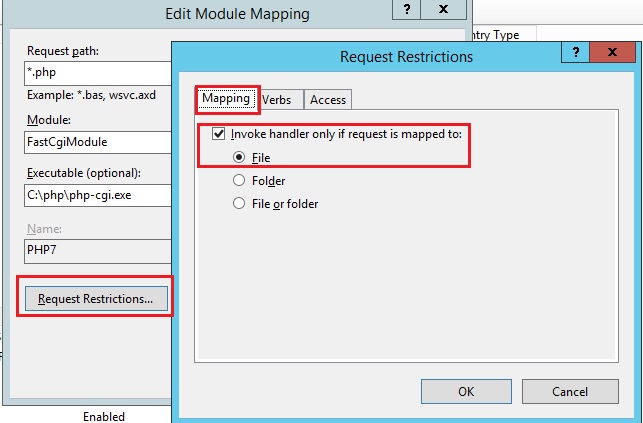
10. Click OK few times and close all dialog boxes.
11: Goto c:\php and make a copy of the file php.ini-production. Name it php.ini
12: Add this to the php.ini
extension_dir = “ext”
cgi.force_redirect = 0
cgi.fix_pathinfo=0
fastcgi.impersonate = 1
13: Save the file.
14: Restart IIS and app pool
Now, it’s time for test.
15: Open notepad, copy and paste this, name this file index.php
<?php phpinfo(); ?>
16: copy this file to a test or dummy site.
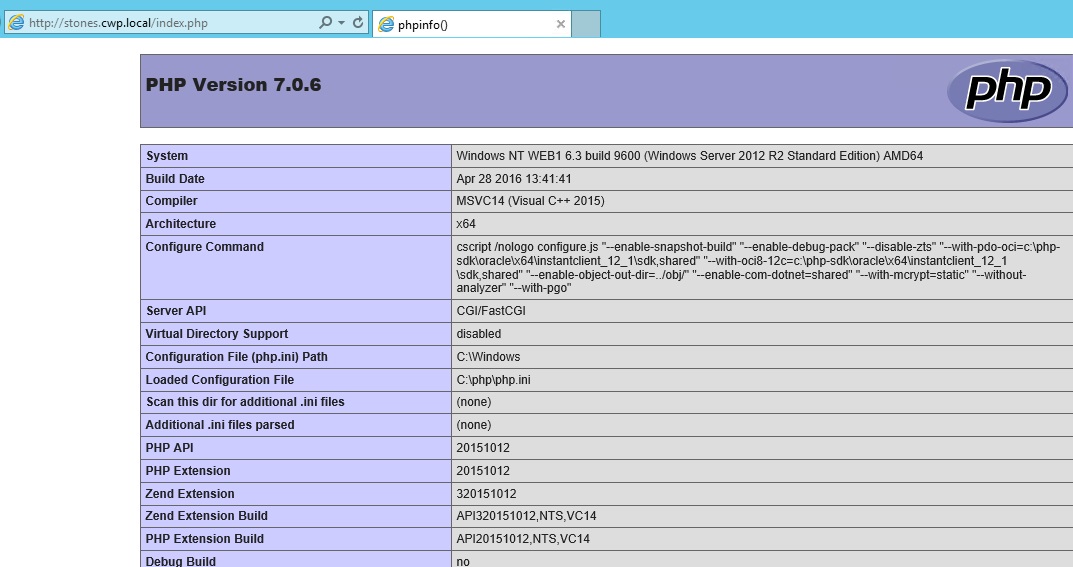
17: Open your browser and type your test/dummy url , for example:
stones.cwp.local/index.php.
18, If successful, the site will look like this:
19: That’s all folks !! Hope this very fast guide is useful to you ! If there is any error, make sure your permission is set correctly, for example in anonymous authentication, are you using App Pool Identify?

Worry about losing your overpriced Garmin? Want to increase your chance someone might return it? Or maybe you want to display your name just for the sake of it?
Introducing Garmin Startup Message!!
- First, connect your unit to a computer via a USB cable. DUH !
- A new drive should show up, double-click on the Garmin folder.
- Look for a text file “startup” and open it up.
- You will see something like this <display=0>.
- Change it to <display=10>, it means the start-up message will display for 10 seconds.
- Next, below the<!– Type your message on the next line–!> you can write:
If found, please return to Andrew @ 91234567. Thanks hor.
- Save and close the file, umount and unplug your device.
Just like that!! Simple huh?
Take note that this feature works for Edge 510 and above.
Disclaimer : Please do a backup on your file, I take no responsibility if you screw something up.
So you want your visitor to upload something using form? Don’t want to install component? There you go:
http://www.cymbala.com/Greg/HowToUpload.htm
Written by: Philippe Collignon
What is Log Shipping?
SQL Server Log shipping allows you to automatically send transaction log backups from a primary database on a primary server instance to one or more secondary databases on separate secondary server instances. The transaction log backups are applied to each of the secondary databases individually.

Benefits
- Provides a disaster-recovery solution for a single primary database and one or more secondary databases, each on a separate instance of SQL Server.
- Supports limited read-only access to secondary databases (during the interval between restore jobs).
- Allows a user-specified delay between when the primary server backs up the log of the primary database and when the secondary servers must restore (apply) the log backup. A longer delay can be useful, for example, if data is accidentally changed on the primary database. If the accidental change is noticed quickly, a delay can let you retrieve still unchanged data from a secondary database before the change is reflected there.
Configuring SQL Log Shipping
Before SQL Log shipping can be configured, there are some preparations to be done.
1: Ensure the database is at Full Recovery Mode.

2: Before you configure log shipping, you must create a share to make the transaction log backups available to the secondary server. This is a share of the directory where the transaction log backups will be generated. For example, if you back up your transaction logs to the directory r:\pri, you could create the \\primaryserver\pri share of that directory. If you are running clustering, you might want to create this on shared storage. Make sure the unc name is pointing to the cluster name.

3: Also make sure sql server agent is configure with the correct credential.

Now we can begin the configuring of SQL Log Shipping.
4: Right click the database you want to use as your primary database in the log shipping configuration, and then click Properties.
5: Tick the checkbox “Enable this as a primary database….”. Then click on Backup Setting.

6: Enter the path(shared folder) you created earlier. Then click on schedule.

7: You might want to change the occurrence to 10 mins or less. Click Ok twice to continue.

8: You will be brought back to the main screen. Click Add to configure the secondary database.

9: Click on Connect and provide the credentials for the secondary DB.

10: On the Initialize Secondary Database tab, click on restore options and specific the path for the logs and data files to be created (this will be located on source server).

11: On the Copy Files tab, specific the destination path.

12: Click on the schedule and change the occurrence to 2 mins.

13: On the Restore Transaction Log, tick the Standby Mode radio button. Also, change the occurrence schedule to 2 mins. Click Ok to continue.

14: Finalize settings and click ok to finish the wizard.

15: The job will run and result will show.

Failed Over to Secondary Database
Before we start, we have to disable the log shipping job on primary server.
16: Check the log shipping is in sync by executing following query on Secondary Server .
select secondary_database,last_copied_file,last_restored_file from msdb..log_shipping_monitor_secondary
![]()
select * from msdb.dbo.log_shipping_monitor_secondary
![]()
17: On the primary server, backup the tail of the DB logs. Use GUI is advisable, if db is in use, run the below query.
use master
ALTER DATABASE staff_record
SET SINGLE_USER WITH ROLLBACK IMMEDIATE
go
backup log staff_record to disk =’r:\backup\logs\staffrecord_tail.trn’ with norecovery
18: Restore the tail log to DR server and bring it out of standby mode.
alter database staff_record
set single_user with rollback immediate
restore database staff_record from disk =’R:\sql\in\staffrecord_tail.trn’
with recovery
19: Check and the bring it back to multi-user mode
alter database <dbname>
set multi_user
go
Now, we would want to setup log shipping on secondary server. Please follow step 4 till 8. Since we are reversing, kindly note of the path and folder.
20: Connect to Primary server this time.

21: Since the primary database is available, we would want to select “no, secondary database is initialized”

Finally, follow step 11-15.
The database on the primary server should turns to gray.
![]()
To failback, simply reverse the steps from 16.
To transfer logins, follow this link :
Need to create hundred or thousand of users for Exchange 2013?
First, create a csv with following field
Name,alias,userprincipalname,designation,organizationalunit,database,password
andrew lum,andrewlum,andrewlum@fb.com,CEO,Board,mailboxdb1,Pasqwe@123
Next, create a powershell script, save it as ps1 format :
$bulk = Import-CSV test.csv
foreach ($_ in $bulk)
{
$name=$_.name
$alias=$_.alias
$upn=$_.UserPrincipalName
$db=$_.Database
$ou=$_.organizationalunit
$encryptedpass = convertto-securestring $_.password -asplaintext -force
$resetpass = $false
new-mailbox -Name $name -Alias $alias -UserPrincipalName $upn -Database $db -OrganizationalUnit $ou -Password $encryptedpass
Set-User $_.alias -Title $_.designation
}
Finally, open a exchange shell and run the ps1 script.
How you edit the field is up to you, depend on your organization, in my example, I created a “Title/designation” field.
Are you in a scenario where you have two monitors, you want to run app or game on the display that you prefer but it doesn’t work quite well? How about if you have a touch-screen monitor and you want your app/game to run on the non touch-screen monitor? Also, with Windows 8 metro screen, it gets complicated isn’t it? Well, there is a workaround.
1: First, set your monitor you prefer as the Primary Display . In this example , display 1 is my touch monitor and display 2 is my main display.

2: Next, launch tablet setting from the Control Panel.

3: Select your touch screen monitor from the display drop down, then click on setup.

4: Now, a calibrate screen should appear, go ahead and touch it.

5: Click OK to save.
6: You can drag the metro interface to another monitor/screen by hitting the Windows+Tab keys combination.

Now, you should able to launch your game full screen on the monitor you prefer and also the metro interface on the other monitor. Here’s the result(left monitor is touch-screen, right monitor is normal screen) :

You might already know how to import pst from Outlook but your users might not know. Hence, as an administrator, this will be your job.
To make your life easier, I will show you how to import user pst from server side, without visiting user desk.
Before we begin, we need to dedicate permission to perform the task.
Assign Import/export permission to a role.
1: Login to Exchange Admin Center.
2: Click on “Permissions” on the Left pane.
3: Select a role you want to assign the permission to, for example Help Desk.
4: Click on the pencil .

5: The Help Desk role properties page will open. Click on the + sign under Roles.

6: Scroll down and look for “Mailbox Import Export”, click Add and Ok to continue.

7: Click Save to finish up.
Now, you would have permission to perform you task, let’s proceed to :
Importing the pst file.
8: Click on Recipients on the left pane.
9: Click on Mailboxes tab.
10: Select the user whom you going to import the pst.
11: Click on the “…” and select Import PST

12: Specify the path, if you store the pst file in c:\temp, the full path will be as follow :

13: Decide whether you want to import the pst to the main mailbox or archive. Click next to continue.

14: Finally, you will be asked whether to send a notificaton when importing is complete.
This whole process will import mails, calenders, notes, tasks and etc to the mailbox.
15: The notification will look like this :
| File: | \\127.0.0.1\c$\temp\andrew.pst |
| Mailbox: | john smith |
| Started by: | andrew lum |
| Start time: | 9/10/2013 6:42:57 PM |
| Run time: | 00:00:56 |
